Sewing Machine Basics
- Difficulty Easy
- Time required 30-60 minutes
In this guide you’ll learn:
- The parts of a sewing machine
- How to setup a sewing machine (bobbin winding, upper and lower threading).
- Tips for working with a sewing machine
Parts of a sewing machine
If you are new to sewing, learning the parts of a sewing machine is an essential first step. Every sewing machine looks slightly different, but they all have the same basic parts. For a detailed explanation, see Alexandra Churchill’s article: The Anatomy of a Sewing Machine: A Guide to All Parts and Their Uses.
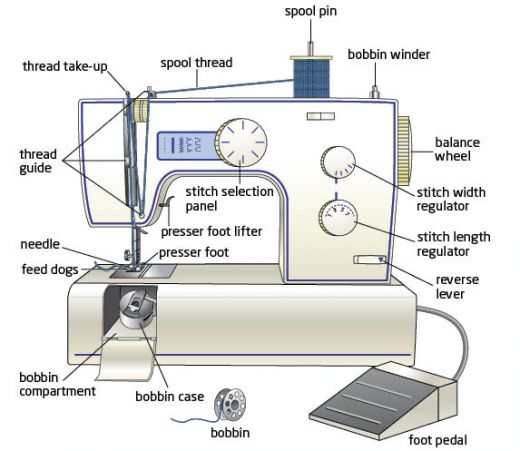
Source: textileaid.blogspot.com
How does a sewing machine work?
A sewing machine works by taking upper spool needle thread and weaving it with lower bobbin thread. Here is a neat animation that demonstrates how it works. The upper thread is shown in green, and the lower bobbin thread is shown in blue.
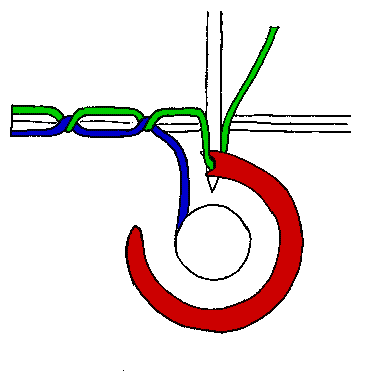
Source: sewingschool.org
1. Winding the bobbin
Put desired thread spoon on spool holder and follow diagram on machine to run thread towards bobbin winder. Bobbin is initially threaded up through hole on top. Pop bobbin on winder holder and push right. Hold on to the thread initially and start winding by pressing foot pedal, cut thread, then continue winding until about 3/4 full. Push bobbin left to pop it out and cut.

Source: Brother XR9550PRW Manual
2. Upper Threading
Turn balance wheel to reveal thread take-up lever. Following diagram on machine, run thread around metal guide, down, back up and over take-up lever, back down, through the metal slit, through front eye of needle, down under presser foot and towards back left of machine.
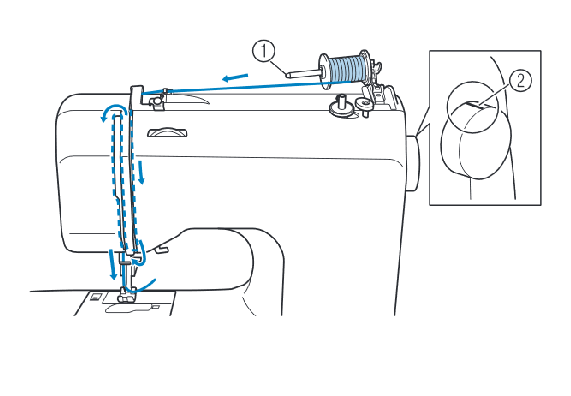
Source: Brother XR9550PRW Manual
3. Lower threading
Bobbin is loaded into the machine with thread oriented counterclockwise. Follow diagram on machine to run thread down, up and around to the left of bobbin. Replace bobbin cover.
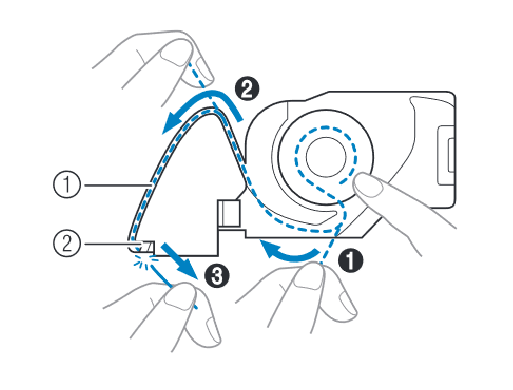
Source: Brother XR9550PRW Manual
4. Use needle to pull lower thread up
Hold the upper thread with your fingers. Turn wheel towards you once so that needle goes down and pulls the bobbin thread up (it may help to gently pull the upper thread). You should see a little loop appear. Use scissors, tweezers, or something pointy to pull the bobbin thread up and out from below the presser foot. Pull both threads towards the back of the machine.

Source: Brother XR9550PRW Manual
5. Stitch settings
Set stitch type to 01 (straight stitch with needle in center position), and set stitch length (top number) to 3.5. The bottom number is for stitch width and only applies to certain stitch types.For simple projects stick to a simple straight stitch type of 00 or 01 with stitch length of 3.5. A 00 stitch is a straight stitch with needle in the left position.
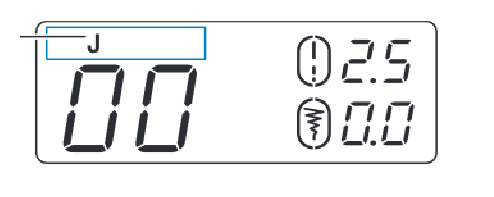
Source: Brother XR9550PRW Manual
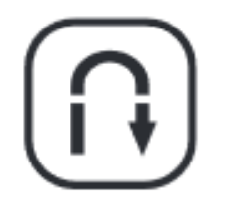
6. Backstitch (reverse stitch)
Always begin and end a seam with a backstitch. A backstitch “locks” the ends of a thread to keep the stitch strong and secure. To backstitch, start sewing and quickly press and release the backstitch button (reverse icon) on the machine. You will see the fabric move forward and then reverse direction, essentially stitching over itself. As you near the end of your stitch, make sure to backstitch to lock the end of the stitch. Then pull the fabric out and cut the thread using scissors or cutter on left side of machine. Leave enough thread to begin the next stitch.
Source: Brother XR9550PRW Manual
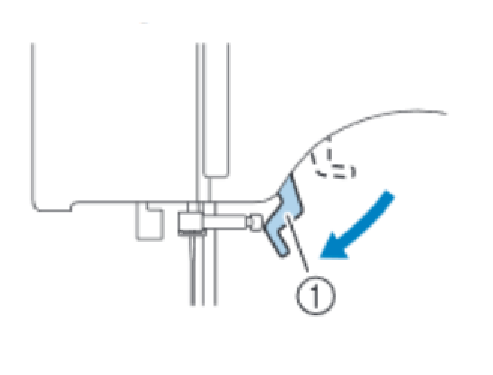
7. Presser foot MUST be DOWN when sewing
Never sew with presser foot up! Presser foot MUST be DOWN to keep fabric from moving around as you sew and to allow the feed dogs to move the fabric through. The presser foot lever is just under and to the right of the needle.
8. Do not push or pull fabric through machine while sewing
Never push or pull fabric through the machine, let the metal feed dog gears do the work. Simply guide the fabric as it moves through. You can use the speed control slider and foot pedal to speed up or slow down the machine.
9. Creasing and folding
Use a ruler & tailor’s chalk to draw straight lines, then use a bone folder to create nicely creased folds which you can then fold over & press flat using a hot iron.
10. Use pins to keep things in place as you work
Use pins to keep fabric in place and aligned as you sew. As the needle gets close to a pin, stop sewing, remove pin and then continue sewing.
11. To make a 90 degree turn (or similar) while sewing
Stop sewing, raise presser foot, adjust fabric position, lower presser foot, resume sewing in new direction.
Practice makes perfect!
The first time working with a sewing machine can be daunting. Don’t give up! It will get easier as you practice and become more familiar with the machine. Practice sewing stitches on scrap fabric, and soon you will get the hang of it!