CloudCannon: How to create a new blog post
- Difficulty Easy
- Time required 5 - 10 minutes
This guide demonstrates how to write a blog post for the CPL Maker Lab website using the CloudCannon admin interface.
Step 1
Log in to CloudCannon. CloudCannon is a website management platform. CloudCannon will sync changes to Github Pages, where the site is hosted.
Step 2
Click the large CPL Logo to open the website dashboard.
Step 3
Click on Explore > Guides > + Add Post
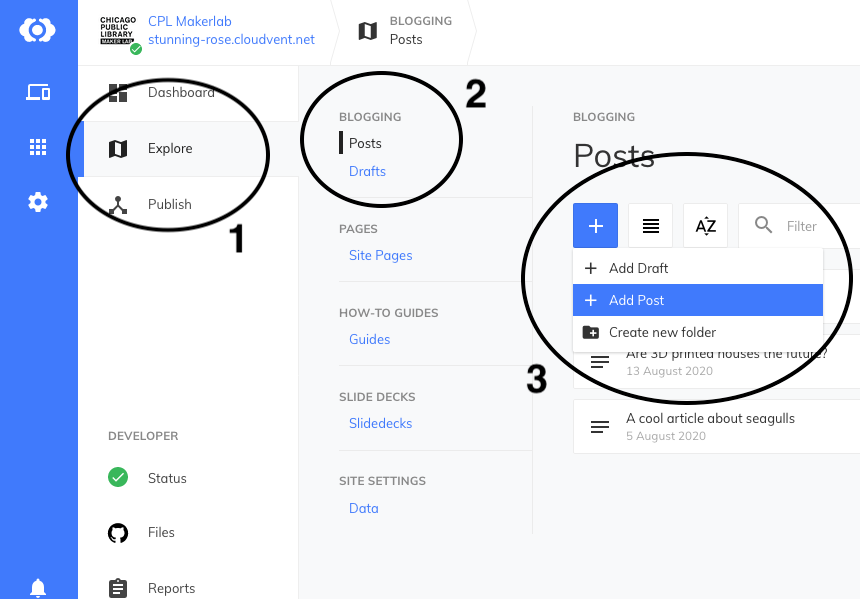
You can also choose + Draft if you want to compose a draft of your blog post and publish it later.
Step 4
In the sidebar, enter a title for your blog post. You can manually enter in the date or simply leave the field blank. If left blank it will populate the time field when it is first published.
Feel free to add as many tags as you’d like. The tags will be displayed at the bottom of your post where visitors can look up related posts by tag.
Step 5
It’s a good idea to save early & often, so go ahead and click the SAVE button. CloudCannon will display status messages as it saves and rebuilds the site.
Step 6
On the right side is where you’ll enter the content for your blog post. Use the content editor toolbar to format your text. Hover your mouse over a toolbar icon to reveal what it does.
You can embed images using the Image button in the content editor toolbar. Please try to keep images a reasonable size (~1024px wide) as they cannot be resized after you upload to CloudCannon. Files will be saved to the /uploads folder.

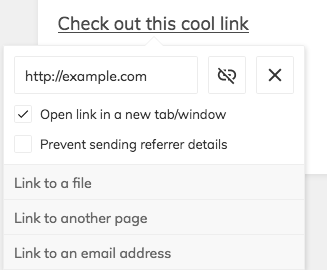
You can create links by highlighting some text and then clicking the Link button. It’s probably a good idea to have external links open in a new window/tab. You can also use links to upload and link files within your blog post.
![]()
You can embed Youtube videos using the Embed button in the content editor toolbar.

Step 7
When you are done writing your blog post, don’t forget to hit SAVE!
Step 8
Your new blog post will be published at cplmakerlab.github.io/blog. Note that it may take a few minutes for any changes to appear as your site must resync & rebuild after every save.
Note: If you chose to create a DRAFT first, the blog will not be published until you publish the draft. To do that, click the PUBLISH button at the top of the page.
