How to Make a Wood Carving with a CNC Mill
- Difficulty Medium
- Time required 2+ hours
In this guide, you’ll learn how to design and fabricate a small wood carving using a desktop CNC (computer numerical control) milling machine. A milling machine works by using a automated drill/router to carve into material such as wood or plastic. The speed, position, and depth of the bit is controlled by a computer. These particular instructions are for the Inventables Carvey machine.
Step 1: Login to Easel
In your browser, navigate to https://easel.inventables.com and login or create an account if you haven’t yet. Once you’ve logged in click “New Project”.
Step 2: Change machine type
Once you are in a new project, you’ll need to adjust the settings of the software to match your machine and material. In the top menu, click Machine and select Carvey.
Step 3: Material and machine settings
On the right side of the screen you can change the settings for the material and the machine. Click the material setting and change the dimensions to match your workpiece. For instance if you are carving a 4” square piece of 1/8” thick maple hardwood change the dimensions to 4” x 4”x .125” and set the material to “Hard Maple.” Change the bit setting to a 1/8” straight cut bit and make sure the bit in the machine actually matches the software setting – it is not automatic. If the software settings don’t match what you actually have in the machine, you can damage your material or even the machine itself.
Different bit sizes and shapes will carve differently. Large bit diameters will quickly remove lots of material but can’t carve small details. Small bit diameters will carve with finer detail but will take much longer to remove material. Sometimes it may make sense to change bits and carve in two passes: a first pass with large bit to remove bulk material, and a second pass with a small bit for finer details. Inventables Carving 101 - Bit Basics contains a good overview of different bits and how to select the right bit size.
Step 4: Watch out for clamps!
The left side of your screen is your design workspace. The right side of your screen shows you a realistic preview of how the material will cut.
Looking at your workspace, you’ll see a pink L-shaped area in the lower left corner (if you don’t see a pink area, double check your Machine is set to Carvey). This area is required for the smart clamp, which holds down your material. In addition to this clamp, you will also need to add a few clamps on the other sides of your material to hold it down securely while it cuts. These clamp areas are important to make note of because you don’t want to place any design elements where a clamp might be! The machine is “dumb” and has no way of knowing if a clamp is in its path. So if you tell it to carve where a clamp might be, the machine won’t be able to stop and will probably carve right into the clamp which can potentially damage the machine (or the clamp).
Because of these clamps, it is best practice is to leave a margin around the edges of your design, roughly .5” - 1”.
Step 5: Create your design

To create your design, use the left toolbar to add text and other shapes to your workspace. You can drag, reposition, resize, rotate, group, and ungroup shapes. When a shape is selected, you can change the depth of the cut – move the slider up for a shallow carve or move the slider down for a deep carve that can cut all the way through the material.
When you add a shape to the workspace, you’ll see a preview on the right with how it will look. If a cut doesn’t look right, try selecting the shape and changing the type of cut. A pocket will cut out the inside of a shape, while cut path follows the outline of the shape. If you see parts of your shape missing in the preview, it is most likely because the bit diameter is too large to cut out fine details of the shape. Try increasing the size of the shape or select a smaller bit.
You can also import custom shapes as an SVG file. To do that, go to File > Import SVG. Once imported, you can drag, reposition, and change the cut depth just like with Easel shapes. This allows you to use Inkscape’s powerful vector editing tools to create complex designs.
Lastly, it is possible to overlap shapes and give them different cut depths. However, the way the machine cuts overlapping shapes depends on the order that the shapes are stacked. If you right click on a shape, you can send a shape forward or backward to change which shape maintains priority during a cut. As you change the stacking order, the preview will update to show you how the final result will look. Use the preview to tweak the settings until things look correct.
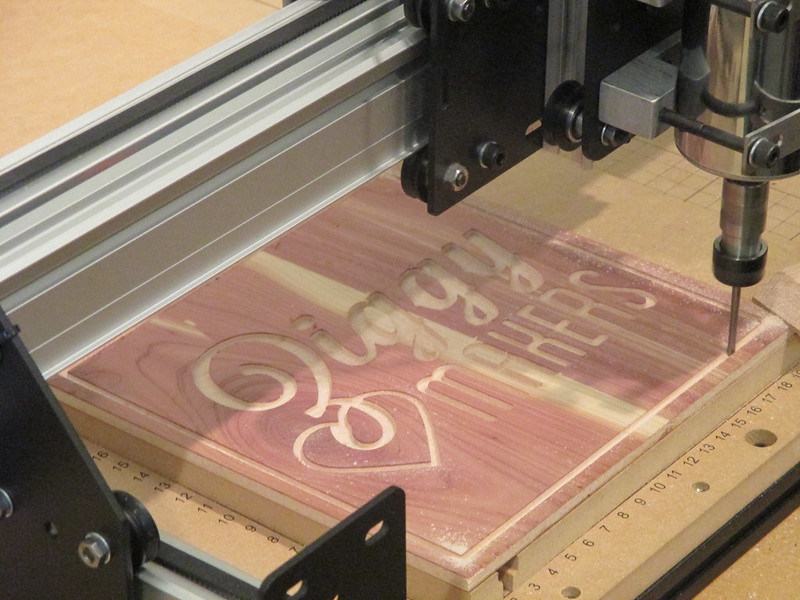
Step 6: Carve!
Double check again the size of your bit and the position of your clamps to avoid collisions. Reposition so the design does not overlap with any clamps. Remember, the machine can’t detect the clamps and will run right into them!
In the lower right of the preview window, click Simulate to get an estimate of how long your carve will take. The simulation will show the tool path, and provide a time estimate. You can press the play button or drag the simulation slider to see exactly how the machine will move. If you have deep cuts or use a small bit diameter, it will take longer to mill.
If everything looks good, click the CARVE button in the top right and follow the instructions. It will ask you to confirm settings, and then being cutting.
What’s next?
Hopefully now you understand the basics of CNC milling! Looking for project ideas? Try carving a monogram, woodblock print, coaster, or topographical map. You can touch up your piece by painting it or finishing the wood with a clear coat.
If you are interested in learning more about CNC milling, watch Carving Bits 101: Bit Basics and Carving Bits 201: Feeds, Speeds, and V-Bits. These videos will discuss some of the more advanced settings when using a CNC mill.